Showing posts with label hike. Show all posts

Thursday, February 11, 2016

Hollywood Sign - Mt. Lee on Canyon Drive


The iconic Hollywood Sign looming above Los Angeles was originally an advertising campaign for a housing development "Hollywoodland" back in the glitz and glamour of tinsel town in the 1920's. An entire historic timeline of the Sign can be found on the Hollywood Sign website.

It is a pretty interesting read, from when it first got erected, to the famous 1930's suicide of a breakout film star, the erection of network antennas that networks eventually moved to Mt. Wilson, stories of vandalism and arson, to eventually a very well fenced and guarded Sign that it is now.

Today, when you make the trek up to Mt. Lee, where the sign stands, helicopters can be seen flying by in regular intervals ready to call any fence-jumpers out. And a wire fence was built to keep anyone from getting close to the historical landmark, which earned its designation in 1973 by the Los Angeles Cultural Heritage Board.

Trail


  • 7 miles (round trip)
  • 1,000 feet gain
  • Out and back 
  • No permit needed
  • Location: Griffith Park, Los Angeles, CA

Trail head


At the southwest part of Griffith Park, the trail head is located at a small picnic area at the end of a residential road, heading north on Canyon Drive. The place has a small parking area just next to the metal gate that starts the trail and an over flow dirt parking lot just before. It gets busy on the weekends. Best to get there early to snag a spot. And be courteous in parking.


The Hike


Just a heads up, if you're expecting a backcountry, wilderness, solitude type of a hike, this is not it. This trail gets busy with all types folks, from runners to hikers to dog walkers. And you'll even get to share some portion of your hike with a horse pack doing a horse ride tour around Griffith Park. And the park itself, is located right smack dab in the middle of densely populated Los Angeles, Accessibility is very easy which makes the area very popular.


But the novelty of an instragram-able, snapchat-worthy photo op up at Mt. Lee with the Hollywood Sign, combined with a good workout for the day, is awesome enough to take on this hike and bring your active non-local friends and family visiting along.


The trail starts beyond the metal bar gate, and is wide enough to be fire road.

Past the gate, on your right, you'll pass by what seems to be remnants of  a road? A dam? To be honest, I'm not so sure. But it has been "decorated" by some anonymous "artists".

The trail continues on along going up, walking along the ridge of a hill. You'll come up to your first junction, take the left and continue walking up. The trail is still wide and walks up to a view point with a bench overlooking Los Angeles.


Following the trail along, you'll reach a fork ahead. Much as you'd like to rather take the left of the fork since it seems to be heading down, don't. You'll end up at a horse pack station.

Take the right of the fork that is headed up and continue following along the dirt trail.

The dirt trail ends on an asphalt paved road, the Mt. Lee Dr., and you have an option to turn left or right.

Although the Hollywood Sign maybe in front and slightly to the left of you when you look up, trust the road going to the right and further climbing up will take you closer to it.

Pavement hiking isn't as much fun but the overlooking views of San Fernando Valley you'll see along makes up for it.


Along the way, you'll come up to a small monument marking a spur dirt trail to Cahuenga Peak. Head towards the left following the pavement to get to the Hollywood Sign and you'll soon start to see the back of the Sign.


Walk further up towards the fenced-in buildings and climb up the dirt path to your left to get a better view and photo of the sign with the overlooking view of Los Angeles atop Mt. Lee.


Head back the way you came in!

-----------------

P.S. If you're like me who gets sad and annoyed seeing trash around, bring along a plastic bag and a pair of gloves, if you can. With the spot's popularity, it sadly gets trash a lot. (Leave No Trace)

Friday, May 29, 2015

The Toadstools - Grand Staircase-Escalante National Monument, Utah

"Don't know how you do,
the Hoodoo (Voodoo)
that you do.."
- Salt N Pepa

(Lyrics tweaked to feature this awesome formation in Grand Staircase-Escalante National Monument. Yes, my age might show a bit with my particular choice of artist to relate this.. Haha!)


  • 1.5 miles (round trip)
  • Out and back
  • Exposed trail
  • Elevation: 100 feet (nothing significant to worry about)
  • Location: Grand Staircase-Escalante National Monument, UT

The Toadstools of Grand Staircase-Escalante National Monument (GSENM) is an easy hike to do. Less than a mile one way and with little elevation gained, this is an excellent add-on to your long list of things to-do in the area without having to scratch off anything.

The trail head is located along Highway 89 between mile markers 19 and 20 (but closer to Mile 19) or about 1 mile East of the Paria Contact Station. Be on the lookout for any parked cars, if there are any 'cause it does not get packed, or for a small man-made podium-like metal structure that houses the trail register. If you're headed in the direction of Page, AZ it will be on your left and if headed towards Kanab, UT it will be on your right. There is an ample spaced parking area as you turn off from the road. No need for some dirt road 4WD driving.


The trail begins by the trail register, behind a fence and heads northward. The trail is easy to follow but should you find yourself losing the trail just follow the wash or riverbed looking path. It didn't have water when we visited but it the mud was soft showing previous water run-off. The trail runs along beside it, crisscrossing it a few times.


There are trail markers along the way pointing which direction you need to go. Just keep an eye out for them.


After a rain fall, watch out for muddy trails!


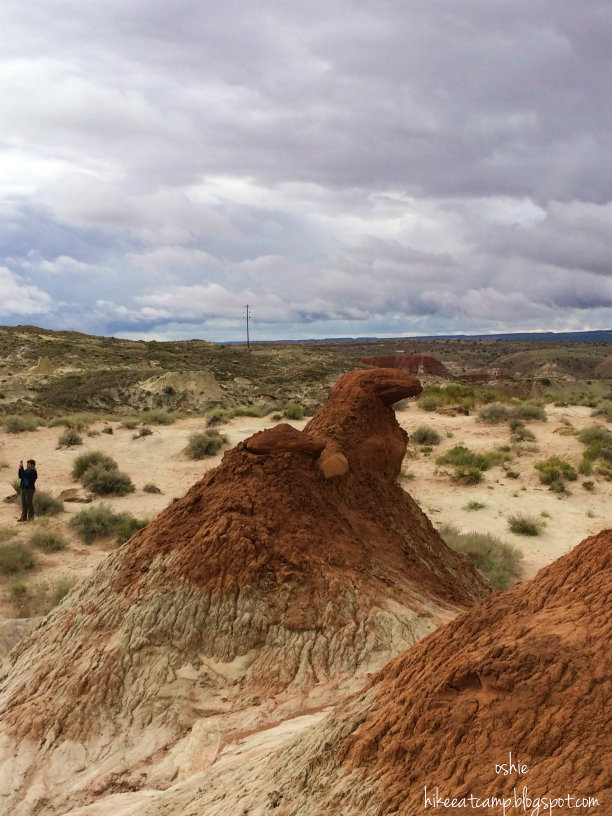
The trail continues around a small hill before climbing up a bit with the ground changing from red soil to white. Not long after you'll see a glimpse of the towering red toadstool. You'll note the changes of ground hues, from red to white to red again.. then white again all the way to the towering plateau.


Looking around, the landscape makes you think if you're still on Earth! Are we Mars? Is this a Moon hike? (shoutout to the moon hikers of #hikerchat!).


The trail continues on past the tall red toadstool with more toadstool hoodoos, red and white, to explore around.


We visited during a wet weather witnessed small soil crusts fall from a toadstool and heard echoes of huge chunks falling off somewhere in the area. We couldn't find where it was. It was an eerie experience, as we were the only ones exploring around (there were just 4 of us).


To head back to the parking lot is to just follow the same trail heading in to the Toadstools. And like any hike or trip, the going back part seems to always be so much shorter.


On the way back, we did stumble on path that looks to be the making of a trail that heads towards the eastern direction. Probably created by another water run off from the recent rain falls. Plants were growing in the middle of the it, but the path was clear. We only followed it a little bit realizing it was heading too much to the east of where are car is supposed to be before we decided to abandon and turn around then head back the way we came. We still had more Utah explorations to attempt.

Back at the trail head, don't forget to sign the trail register! If you haven't yet at the start of the trail.

Tuesday, May 26, 2015

Horseshoe Bend - Page, AZ


Arizona

  • 1.5 miles (round trip)
  • Out and back
  • Exposed and Sandy Trail
  • Closest city: Page, AZ
  • Coordinates: 36.8794° N, 111.5139° W
  • Weather link: Horseshoe Bend Forecast

You've seen the photos.. on the web, a random postcard, a book.. or just somewhere but can't remember where.. but you've seen it. Admired it. Longed to visit the place and see it with your own eyes. But where is it?

The Horseshoe Bend is located close to the city of Page, AZ. It is about a couple of miles south of the city along Highway 89. On this trip, we were coming from the town of Kanab in Southwest Utah. It was approximately a 75 mile drive on Highway 89S, an hour's worth of travel. A sign will come up on the right, in case the massive amount of cars parked on the shoulder don't give it away.

Enter the road past the sign to get to the ample spaced parking lot meant for the Horseshoe Bend overlook visitors. If you're visiting on a Holiday weekend, prepare for a crowd.

This hike is short and easy with a huge pay off, hence its popularity. You'll see every type of people visiting, from well prepared hikers to flip flop and wedge shoes wearing folks. Don't be discouraged by the crowd, to stand at the edge of the cliff and see the view is well worth the short moment of sacrifice of a solitude hike.

The trail starts at the end of the parking lot by a sign warning hikers to be careful and a reminder that there are no rails at the edge of the cliff! Begin with a gradual walk up a small hill.

The trail offers no shade. So best be prepared with your sunscreen and hat. And if the weather is a bit wonky, drag along that poncho or rain jacket. It may be just a short hike, but who knows how long you will want to stay out there... by the edge... just mindlessly staring at nature's beautiful handiwork.

We visited on a day with scattered rain showers on the forecast, a burst of rain poured hard but short and still completely drenched a few visitors who didn't make a run from the rain.

At the top of the hill, there are a few benches scattered around and a small gazebo on the right, should you need a quick shelter from the sun or a pelting short burst of desert rain. From here, the trail starts to descend offering you views of the visitors milling around by the cliffs edge, selfie-sticks and all.


The best spot for the view? Anywhere. Find an open space and set yourself for a photo op then move to a different spot and repeat. Every spot you choose will yield to a good photo! The Colorado River that flows and carved this 270 degree horseshoe shape made that beautiful and amazing scene to photograph possible. Now for having a solo photo without any unsuspecting photobombers? Well.. just time your shots accordingly and be polite to other visitors!

Karina and Oshie watching the Colorado River

Thursday, November 7, 2013

San Jacinto Peak via Palm Springs Tramway

View at the peak towards the west; Diamond Valley Lake
  • 11 miles round trip (10.78 miles on our gps)
  • 2,318 ft gain/loss
  • Out and back
  • Location: San Jacinto State Park - Palm Springs Tramway
  • Direction (from Los Angeles): 
    • Take the I-10 east for an estimated  93 miles
    • Exit on Hwy 111 (a.k.a. Exit# 111); estimated 8 miles
    • Turn right on Tramway Road by the Palm Springs Visitor Center
    • Parking lot for the Valley Staion is 4 miles ahead
  • Weather link: San Jacinto Peak forecast
  • Permits: FREE Self Issue Day Hike permit outside of Long Valley Ranger Station; Required overnight permit can be applied by mail for $5 per person in the group. Click here for a copy of the application.

The San Jacinto Peak has been in my radar to reach ever since the idea of reaching a summit was ever introduced in my head. To check off the 3 highest peaks of southern California, I thought I'd start with this one as it seemed like the most attainable. Situated at 10,834 feet above sea level, one can reach the peak by taking the aerial Palm Springs Tramway from the Valley Station (2,643 ft) to the Mountain Station (8,516 ft) in about 10 minutes for $23.95 ($21.95 if you're a AAA member!) then hiking about 5.5 miles the rest of the way to the peak.

It wasn't until my third attempt did I finally get to check this off my list. My first try was a planned backpacking trip, camping out at Round Valley with summit day the next day. Alas, the night before our entry date I had eaten something that did not agree with my stomach. On hindsight, I should have just thrown in the towel but I insisted and ended up just staying in the tent and the following day became a hike back instead of summit day. The second attempt on a late May, was so poorly planned that we encountered winter snow that barely started to melt and being snowshoe-less and crampon-less, it was too risky to continue on. It made for a good picnic day still at some random overlook point.

This day was going to be the day. With me always looking for a hiking companion on big hikes, my cousin and a friend were, just so happens, to be looking for a place to hike out that Saturday, it was like.. fate! Opting for a day trip, we were on the road by 6am. Hoping to catch the earliest tram up. Upon turning at Tramway Road by the visitor center, we were greeted by security blocking the road going up to the tram. I have checked the tramway's website and did not find any info for any closures! It turns out it was the 28th Annual Palm Springs Tram Road 6K Challenge. How is that and any road info not plastered all over to warn non-participant visitors, I have no idea. No road closure warnings anywhere, just until you turn on the tramway road, pass the visitor center a few hundred feet and you'll find a sole security car hindering you to go beyond, physically telling people driving up that the road is closed and will be open at 10am. Slight delay but it made for a good reason to pile on fuel for ourselves for the hike. Mmm egg breakfast!

At promptly 10:00 a.m. we zoomed passed the visitor center and up to the tramway's parking lot. Gathered our stuff, eager to get the first trams from the Valley Station. And fate was not done toying with us. Even after getting our tickets a few minutes after 10am, our tram boarding was not until 11:15 a.m. A huge group Junior ROTC got first dibs loading up the tram for some training up top. A big group, but we never saw them again after the tram ride.
Finally boarding time for our tram and 10 minutes after departing the Valley Station, we have finally ascended to 8,000 feet elevation at the Mountain Station. Along the tram ride, the floor of the tram rotates inside giving you different views on the way up. Keep an eye out for when you pass the towers holding the cables, it kinda gives you some quick tummy tickles when you pass by it!

Walked down on the cemented pavement from the Mountain Station to the Long Valley Ranger Station, it was almost noon by the time we filled out our permit and did our first step on the trail and went our merry way to reach the peak.

There is a fork at the beginning of the trail, taking the right fork will eventually meet up with the left fork trail at a junction 2 miles in and about .3 miles before the Round Valley campsite, to be able make the Round Valley Loop hike. We decided to rake the right fork going in and considered taking the left fork on our way down, which would then be a "right fork" -- details, details! haha.


We did a quick bathroom break at the Round Valley Loop junction. Along the trail, just slightly pass the signs, we found some log cabin looking outhouses. Although there are already outhouses by the camps last time we were here, these 2 by the junction looked fairly new.


Outhouses.
After a hop-skip-and-a-jump, we approached the Round Valley campground, we've seen some flat areas that could be good to set-up camp, but we didn't explore the area much. We got to talk to a ranger coming from the Round Valley ranger hut and showed us a map of the Round Valley campground, as well as the Tamarack Valley campground about a .5 mile spur trail right by the only water source in the area.

Trail sign by Round Valley Camp; ranger hut behind.


"Purify water before drinking."
From here, we're about half way to the peak and getting higher. We encountered more snow on this part of the hike, remnants of the early snowstorm the SoCal mountains received from 2 weeks previous, too bad there was no follow-thru.. yet! It is about a mile more to the Wellman's junction.


Wellman's junction, A nice overlook area to stop and admire how far high up you've come. A meet-up group we've been leap-frogging with since we started the hike had decided to take their break out here and have the rest of their group catch up. Good choice, I'd say.


2 more miles to the peak and the views along the trail from this point are spectacular. One could easily forget that just earlier you were at sea level and weaving through the urban jungle of Los Angeles. 


A little pass 3:00 p.m. we reached the top, passing by the really nice looking emergency hut (seems more like a cabin on the outside to me!) just .3 miles away from our destination. From here to reach the peak, a little scrambling  is in order. Nothing technical, just some rock hopping, hands and feet usage are involved. A bit more of fun, for sweeping views of the desert floor and some must-have photos of the benchmark.

Hut by 0.3 miles from the peak - an emergency shelter for stranded hikers.


We didn't get to stay much up top, rested for a bit after the obligatory photo souvenirs were taken, then headed off into the sunset (yeah - I did that.. LOL). We came across a couple of more groups trying to make it to the top before dark, sun sinking in the horizon on that clear day would have been amazing to look at! That'll be my next trip here.. after winter (snowshoeing first!).

We were trying to get to the tram before dark sets in, seeing as I broke my glasses by the peak (thanks for catching my glasses, rocks!), hiking in the dark even with headlamps, I know I'd still have a difficult time. Don't want to be even more a liability, as it is I'm already slightly blind without my glasses. On the way down, dusk was starting to settle in, a tad earlier during this season. I was sandwich by my companions. My cousin behind me and his friend leading the way - grateful that I have the extra brightness of having more light behind and more light in front of me. We made back to the Mountain Station, cursing the pavement climb on the way. Exhausted but stoked we didn't backed down even after all the delays we kept encountering earlier. San Jacinto Peak, you've just finished my 3 peaks goal for Southern California!

Thursday, October 17, 2013

Hiking The Big Pine - North Fork Trail to First, Second and Third Lake


Pano view of First Lake with a peek at Temple Crag on the right.

  • Miles: 11 miles round trip (First Lake)
  • Elevation: 2,100 ft (gain/ loss)
  • Type: Out and back
  • Location: John Muir Wilderness - Big Pine, CA
  • Note: Backpacking, Day Hike
  • Permit: Required for overnight trips only; Not required for day hiking
  • Permit Issuer: White Mountain Ranger Station - 798 N. Main St., Bishop, CA; (760) 873-2500
  • Notes: Primitive campsites; No bear boxes at campsites; Also a horse-pack trail (watch your step!)

When in need for a quick fix of some sublime nature extravaganza, but short on time. This trip is a good cure. It has the promise of greenery, a good workout, mountain air and lakes! Lakes, that I think the people who are assigned to name lakes ran out of names for them.. or as I'd like to sometimes think that they just got awed by its beauty that no words to name them came out and they've just numbered them from First Lake, Second Lake, Third Lake.. and so on. Either way works out for me. 

For an overnight trip a permit is needed, day hikers need not worry about this part but feel free to visit the ranger station still for some trail conditions, weather updates and alerts. A permit can also be reserved online at Recreation.gov - trail code: Big Pine Creek North Fork J23. Fill out the necessary information, including names of alternate leaders from within the group, who can pick up the permit if you are unable to. The following are the permit fees:


  •  $5 fee per person entering the wilderness
  • $6 fee (not per person) for reservation
  • Example: For a 6 person trip, reservation will be a grand total of $36.00 (no other additional $$ like taxes and such)

You'll receive a confirmation email but this, however, will not be your permit. Drop by the White Mountain Ranger Station to pick up the actual permit, confirm the number of people reserved, leave car information and get some last minute alerts & chit chats. This is best done before 10:00 a.m. on the entry date, else the reservation will be cancelled and deemed a "no show". Also, if lacking the required bear canister for the overnight trip, the ranger station rents them out at $5 per day.

Getting to the trail head, when coming from the ranger station in Bishop - head south on Main St., that will eventually turn into US Route 395, you'll know the change when the speed limits change. It is about a 20-30 minute drive to the town of Big Pine. Once at Big Pine, turn right on to Crocker St. As of this writing (2013), its structure landmarks are a gas station and a general store on each corner. Continue driving past the cute, sometimes western themed, houses until the road turns into Glacier Lodge Road. This would be about a 12 mile drive to the trail head passing several car camping areas, including the Big Pine Campground. You'll eventually see a sign on your right directing you towards the hiker's parking lot where the trail head is and an outhouse is located. There are 2 bear boxes located at the parking area to store all your smelly stuff so you don't leave them in your car:


  • One by the restroom
  • Another by the last parking space going towards west of the "trail" sign

If day hiking, there is an optional limited parking area at the end of the road continuing past the hiker's parking lot sign, with a restroom as well. Leaving your car on this spot would free you of about an extra mile of hiking. But remember, it has limited space and no overnight parking.


Dark clouds looming at our destination.

The trail starts, just left of the signs (trail info and the usual not to scale trail maps) and restroom. It climbs up to the side of the hill following along the road that continues to the road's end. You'll start to notice the cars passing on the road grow smaller and smaller as you continue your way up. You'll soon pass a horse pack structure on your left. Then about almost a mile of hiking, you'll see a few picnic tables and a restroom structure below you on your left. You have arrived at the junction where the trail splits to the South Fork Trail and the North Fork Trail. Walk a little further and you'll find a trail that leads down to it, camping spots with picnic tables and a restroom.

Photo taken on a separate trip by me; cam owned by Cathe (photo)


Continuing on the trail opens up to a beautiful valley before starting the climb up again. Up and out the valley you'll see trail signs keeping you on check on the North Fork Trail and then a perfect photo op (proof to your friend where you're at! lol) with the John Muir Wilderness sign. Just a little pass the sign, you'll see Second Falls (yes, even the falls are just numbered). A bit rocky climbing down closer to it, but excellent spot to refill your water bottles and freshen up a bit if you've had quite a sun exposed last mile. The next stretch of the trail runs alongside the creek with welcoming shades from the trees and not long after you'll arrive at Lon Chaney Cabin. A good place to take a quick break and enjoy the creek by the porch, after your 3 mile hike.
Cabin commissioned to be built by the late movie actor, Lon Chaney, Sr.
You'll eventually start to have a glimpse of the beautiful milky blue waters you'll get to see at the lakes above, notice the colors on the creek you've been trudging along on. About a  mile.. a mile and half more you'll arrive at a junction, taking the left fork will take you to First Lake. You are just about a hop, skip and a jump from here for your first grand view of First Lake. Camp sites on First Lake can be found just below the trail, before you emerge on top of the rocks with that grand view of the lake. The area is a small wooded basin and has pretty good access to the lake with lots of sunken rocks to perch on if you get camp water duty.

We decided to set-up camp out here on our September trip and get an early dinner on since the clouds did not look like they wanted to share the sun anymore. And sure enough, after meal and washing up, the rest of the late afternoon till we fell asleep were spent playing cards and reading inside our tent while we listened to the rhythmic sounds of rain falling on our tent fly. The following day has been decided as a day exploration instead of our original plan to camp at Third Lake.


There is but very little elevation to gain from this point on to Third Lake. All that is left is but a quick 2 mile traipse in the forest absorbing all of nature. You'll find several more good choices of camp areas in between the 3 lakes with equal gorgeous views of the lakes.

Wildlife found! They're such troopers. No bad weather will turn them away from this place.
Clouds trying to conceal Temple Crag from us at Third Lake.
Chris contemplating another cold water jump.
Temple Crag can be viewed closer and more front and center at Third Lake. We've set-up our luncheon feast by Third Lake. Climbing down from the trail, closer to the edge of the lake, we picked a perfect spot to plop ourselves down for the day. And as Chris's tradition, a trip with a lake is not complete without plunging into the water, ice cold or not - us, ladies, were not so brave on that aspect, especially with the wind blowing every so often and the clouds trying to hide the sun from us again. We're just content to take photos as proof of his wet 'n wild shenanigans and happy to cheer him on.


The winds started picking up, and more & more people seem to have found our little spot by the lake when large groups of day hikers started settling in for their picnic, we decided to head back to camp. Guess, we got to our lunch spot for the day just in time to miss the lunch rush! We were covering good time on our way back to camp that we've decided to stop by some spots and enjoy some more spectacular views. The clouds did not succeed this day and the skies showed us an abundance of blue.


Arriving back at our tent, it was time to break camp and head on out. Back to the parking lot.. back to the car.. and back to the norm.